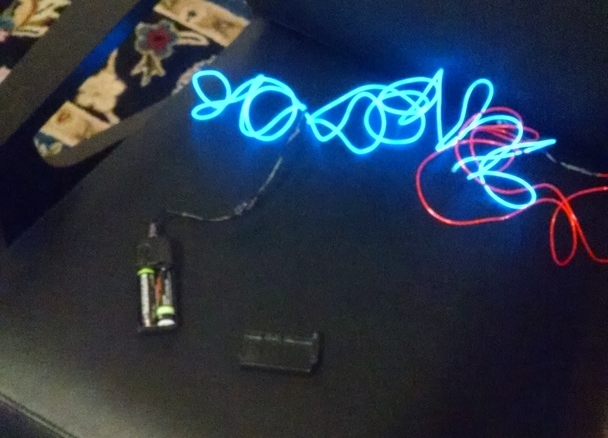
I've been slowly picking up electronics over the past year. At this year's Burning Man, 3 out of 5 EL wires broke on me. This time, instead of e-cycling them, I decided to use it as a learning opportunity.
If you've never done electronics before, SparkFun is a great resource. This video got me into it by finally understanding how to debug (like me learning about Firebug for the first time):
2017/10/11
The first step was isolating the problem. The EL wire I have is 1 circuit + battery holder and 1 wire which clips in.

I took 1 broken blue set and 1 working red set and tried different mix and match combinations:
- Red wire + red circuit - WORKS
- Blue wire + red circuit - WORKS
- Red wire + blue circuit - FAILURE
- Blue wire + blue circuit - FAILURE
That made it definitive that something in the blue circuit/batteries was broken. It was possible it was the batteries so I double checked:
- Blue circuit + blue batteries - FAILURE
- Red circuit + blue batteries - WORKS
Okay, now it's definitely the circuit
Next, I wanted to keep on isolating the problem. I opened up both of the circuits and visually inspected them
There were no visually broken capacitors so maybe it was connectivity issue
I connected a multimeter to the ground terminal of where the circuit would be. Then poked around with the positive terminal on the rest of the board
Everything seemed connected on both boards
I couldn't figure out what was wrong
Then, I decided to connect to the button's solder points
Ah ha! It looked like the red circuit's button worked in any direction whereas blue's button only activated when pushed in a very specific corner
I put the blue circuit back together and pushed the blue button in its specific corner and it worked!
So the problem was most likely the broken button
I had only soldered once before this point and that was for jumper headers so I was taking things slow and stopped for the night
2017/10/22
The idea I had to verify the button truly was the problem was to replace it with wires as a proof of concept
As a result, I:
- Verified wires would fit through button's casing hole
- Desoldered the button
- Soldered in wires
- Reconstructured the chassis (so I could add batteries/power -- I don't have a power supply)
- Touched wires together
It worked!!
For double sanity, I hooked up the button to the multimeter and confirmed it only worked in the specific corner
Some time between 2017/10/22 and 2017/12/20
Now that the issue was identified, I decided to order replacement buttons
However, clearly this wasn't going to future proof the device from it breaking again
At the time, I thought the issue was the buttons being too tall so my solution was to buy a shorter button, hot glue it to the top of the case, and run wires to the PCB's holes
I'm still a little doubtful that that was the problem (e.g. could have been dust from Burning Man getting into the button's internal circuits)
So I might wind up taking even more precautions in the future (e.g. taping over the button's hole)
Anyway, at this point I bought momentary buttons to get started
2017/12/20
The buttons had arrived and I did a simple placement test to verify it would fit
2017/12/31
I hot glued a button to the top of the case
I verified its connectivity afterwards (e.g. heat could damage circuit)
Don't worry, I still went out on NYE ;)
2018/02/14
Another delay, this one was caused by wanting to buy a fume extractor and personal life
I also purchased a new soldering iron for better temperature control (Hakko Fx888-D is wonderful). My old solder was a Weller with no knobs, only a plug for the wall outlet
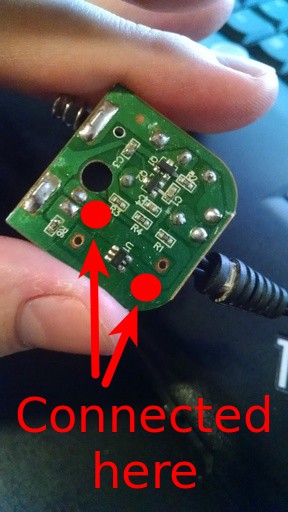
After they arrived, I desoldered the EL test wires
2018/02/19
The following is directly from my notes:
- Delay due to purchasing wire strippers and solid core wire (24 AWG from hardware store, couldn't find 22 AWG =(
- Learned to "wet" wires before soldering
- Soldered wire to button
- Ran wires through holes
- Tried to solder again but the traces weren't accessible (soo much wicked off or burned over)
- I now know how to deal with this (see Adafruit troubleshooting later on)
- Dropped temp to 650
- Soldered into alternative holes but those weren't connected to the proper traces
- Tried another board
- Desoldered button partially as well as snipped ends as well as broke physically
- I was trying to avoid ruining traces. Unfortunately, I still did
- Soldered 1 wire fine but trouble with other one
- Solder was getting onto wire but refusing to go on pad so it would stay on wire or iron
- Got frustrated multiple times
- Finally read through https://learn.adafruit.com/adafruit-guide-excellent-soldering/common-problems
- First tried isopropyl alcohol then soldering again
- No luck
- Got frustrated and read some more
- Tried scraping with knife and saw copper lead exposed as mentioned towards bottom of article
- Exposed enough copper lead and soldered to it
- Closed up case, inserted batteries, and pressed button
- LED was displaced so could barely see it
- Connected to EL wire
- IT FUCKING WORKS!!